Showing posts with label recipes. Show all posts

Monday, March 2, 2015

How to Knead Bread Dough 101

Hi!

I've had many people ask me how to knead bread. They say they just can't get the rhythm down. And yes, there is a rhythm to kneading dough. It's takes practice and time to perfect the art of dough kneading *wink*, but it is easy to do and pick up on.

When you knead dough, you have to make sure you are kneading it all the way, and not just pushing it a little. The better the knead the better the dough will be.

So, here is how you do it.

Bread Kneading 101

First, you want to make sure your dough is the right consistency. Not so sticky its like putty on your hands. Just a little tiny bit of stickiness is good.


 Make sure you have enough flour on your work surface so that the dough doesn't stick to it.
You will need to add more flour to the surface and your hands as you work it.
~ ~ ~ ~

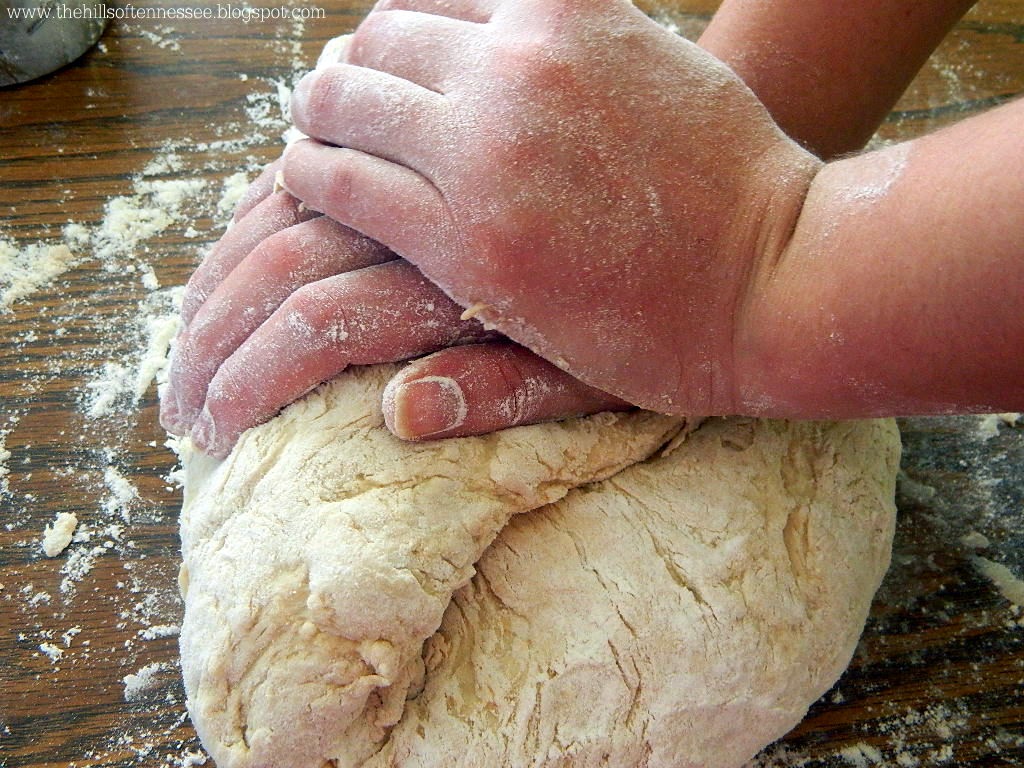
First, fold in half and press down with the heel of your hand all the way to the table. I use a down and push forward technique. Press down with the heel of your hand and push out in front of you. There will be a small tear in the bottom of the dough.
.
~ ~ ~ ~ 
  Turn it 180*, then repeat


~ ~ ~ ~

When the sides of the dough begin to tear apart, you are doing it right.
Just make sure you push all the way down to the table.
~ ~ ~ ~ ~ ~ ~ ~ ~ ~
You don't want the following picture to happen.
This means you aren't using enough flour on your hands to keep the dough from sticking. And, it makes the job a lot more difficult.


This is a big no no
~ ~ ~ ~
Your finished dough should look like this. Smooth and silky, and not sticky.

 
Just repeat the process and you've got it.
 
Fold in half, push down and out, turn, fold in half, push down and out, turn.
As you continue to knead your dough, you can feel it changing. First it will be sticky and kind of just everywhere. Then it will begin to harden and shape. By the time you finish, it will be soft, smooth and pliable.

Only as flour as you need it while kneading, and only a little bit at a time. If you add too much dough, it will make the bread heavy and yucky.

It's that easy. The more you do it, the better you will get.
 
Happy Kneading!

Homeamde White Loaf Bread

Homemade Bread
 
 
Here in the south, we love us some homemade-fresh-outta-the-oven bread. Slap on some butter and bite into that steamy goodness.....Wow! So good!
 
I've made a lot of bread.... and I do mean a lot. I've tried a lot of recipes, and I do mean a lot. Out of all the recipes I've tried, this one is my favorite. I've tweaked and tried and have finally found the perfect one for me and my family. And it is positively delicious!
 
This recipe is also great with whole wheat flour. My family doesn't really care for all whole wheat bread, so we do half and half. Half whole wheat, half white. And it always turns out perfect. Never heavy or grainy.
 
So buckle up, and hold on tight to your socks. Cause biting into a slice of this scrumptious bread will knock them right off!
 
(I will include just the recipe without the pictures at the bottom for easier printing or saving.
 
Hannah's Homemade White Loaf Bread
 
Let the baking begin! 
 
 
2 TBSP yeast
2 1/2 c. warm water
2 tsp salt
2 TBSP sugar
1/2 c. milk
3 TBSP melted butter
6 - 6 1/2 c. white all purpose/ bread flour
(or 3 c. white, 3 c. wheat)
 
 ~ ~ ~ ~ ~ ~ ~ ~ ~ ~
 First, sprinkle yeast over warm water and whisk.


~ ~ ~ ~ ~ ~ ~ ~ ~ ~
Next, add the milk, butter, salt & whisk well.


~ ~ ~ ~ ~ ~ ~ ~ ~ ~
Now, mix in 3 cups of flour until mixture is smooth.


Should look about like this.

~ ~ ~ ~ ~ ~  ~ ~ ~
Then, gradually add in the rest of the flour.
(sometimes I have to use more or less flour, just depends on the day.)
Add enough to make the dough soft and workable. It should start pulling away from the sides of the bowl when it is about ready.


You don't want it to stick all over your hands,
but still have a little bit of stickiness to it.

(At this point, choose a large bowl that the dough will be rising in. Turn your oven on 100* and place the bowl in oven. This will warm the bowl and assist in the rising process.)
~ ~ ~ ~ ~ ~ ~ ~ ~ ~
Now the fun begins!
Turn dough onto a floured surface and knead until smooth and satiny, about 10 minutes. It should be at a consistency so that you can work with it, and it will not stick to your hands.
(Click here for instructions on the best kneading technique.)


Add flour to your hands and the work surface as needed. Just be sure to add a little at a time. Too much flour will make the dough dry, hard and heavy.

~ ~ ~ ~ ~ ~ ~ ~ ~ ~
Now, you can remove your bowl from the oven and turn the oven off.
Take a little oil and put a small coating inside the warm bowl.
 

~ ~ ~ ~ ~ ~ ~ ~ ~ ~
Place your now kneaded and soft dough into the warm bowl.
Flip it once to coat the top and bottom
(This prevents it from sticking as it rises....sometimes *giggle*)


Place a kitchen hand towel over the bowl and place in the oven. It should still be warm from when you heated the bowl. DO NOT turn the oven on.

The warmth from before will keep the dough warm enough the activate the yeast and rising process.  If your oven is too hot, just leave the oven door open.
(if it's exceptionally warm in your house, no need to place in oven. Just leave on a surface where it will not be disturbed.)

~ ~ ~ ~ ~ ~ ~ ~ ~ ~
Allow to rise, undisturbed, for 1 hour, or until doubled in size.

DO NOT disturb or touch the dough until it's finished rising!!


~ ~ ~ ~ ~ ~ ~ ~ ~ ~
After it has finished rising, punch down the dough in the bowl.
Yes, now you can touch it.
 
 Knead slightly in the bowl. About 10 good turns will be good.
All to rest for 15 minutes.
 
 
~ ~ ~ ~ ~ ~ ~ ~ ~ ~
Spray your working surface with oil and turn your dough out onto it.
At this point, you don't want to use any more flour.


~ ~ ~ ~ ~ ~ ~ ~ ~ ~
Slice your dough into three equal parts and form into loaves.


~ ~ ~ ~ ~ ~ ~ ~ ~
Place in greased loaf pans and brush the top with butter.
Put them either in the now cool oven, or on a place where they will not be disturbed.
Place the towel back over the dough &
allow to rise for 1 hour or until doubled in size.


~ ~ ~ ~ ~ ~ ~ ~ ~ ~
Remove towel and bake at 350* for 30 minutes.
Brush tops with butter again.


~ ~ ~ ~ ~ ~ ~ ~ ~ ~
 You should always allow your bread to cool a little bit before slicing into it.

Good job! Now dig into that yum-o-licious bread!
 
Happy Baking!


Hannah's Homemade Loaf Bread
  • 2 TBSP yeast
  • 2 1/2 c. warm water
  • 2 tsp salt
  • 2 TBSP sugar
  • 1/2 c. milk
  • 3 TBSP melted butter
  • 6 - 6 1/2 c. white all purpose/ bread flour
  • (or 3 c. white, 3 c. wheat)
Sprinkle yeast over warm water in a large mixing bowl. Whisk until dissolved. Blend in the salt, milk & butter. Beat in 3 cups of flour with a whisk until mixture is smooth. Gradually add enough flour to make a soft, workable dough that pulls away from sides of the bowl.
 
Turn your oven on 150* and place your rising bowl in the oven. Turn dough onto a floured surface and knead until smooth and satiny, about 10 minutes. Sprinkle more flour onto surface and hands as needed.

Remove bowl from the oven and turn oven off. Lightly grease the bowl. Place dough in the warm greased bowl, turning to coat both sides. Cover with a towel and let rise 1 hour. Punch down dough and knead lightly in bowl . Let rest 15 minutes.
 
 Divide into 3 equal portions. Place in loaf pans and allow to rise undisturbed for 1 hour. Brush with melted butter. Bake at 375* for 30 minutes. Brush with melted butter.
 
Allow to cool before slicing.

Wednesday, June 11, 2014

New Twist on Cooking 'Hard Boiled' Eggs


Call them what you want, hard boiled eggs, deviled eggs, angel eggs, we all make them the same old boring way. Put eggs in a pan of water, let boil, hope they are completely cooked when you take them off the burner. Or, if you have those "Eggies" you put them in their containers and boil away....again, right?

 Well guess what! There is a new and super easy way to make 'hard boiled' eggs, without even boiling! Does this happen to you...Only having two working stove burners when you need all four  and an extra set of hands because you have company coming over in half an hour and your dinner is not even half way done! ?? Yeah, that happens to me all the time! So what do you do when you don't have the time to tend to, or an extra burner for those darned eggs? Stick them in the oven!

Yes, I did just say to put them in the oven. Grab a muffin pan and put one egg in each muffin hole. Pop them in that oven for 20 minutes, then take them out and put all of them in a bowl of cold water just long enough to cool. To peel: Crack top, bottom, and all around egg. Roll on countertop to make sure it is completely cracked all around. Simply slide the egg out of the peeling. It peels that easy! Slice and serve! I make them this way all the time and trust me, it's sooo easy!

Have fun cooking!


(I do not own any rights to photograph. Photo courtesy of Yahoo search engine)

Monday, March 10, 2014

Citrus Juice

Alright Fellow Juicers,

Here is a juice recipe that we came up with when we first started juicing. It is the most delicious and refreshing juice ever! It only has 3 simple ingredients. My mother and I like ours different ways. My mom likes to leave in the pulp, while I like to strain mine out. When you strain out the pulp, it makes an extra smooth juice.

Make sure you peel your mango and oranges. The peel of the oranges are too bitter to juice, it would ruin the juice. The mango needs to be peel and cut around the core as well. DO NOT try to juice the core! As for the apples, you don't need to peel or core them. It all juices well. Just make sure to wash it first.

After testing and trying many different juicers we found that the Omega juicer is our favorite. We bought and borrowed juicers from everywhere and for us, none of them can compare to the Omega auger juicer! We bought ours from Amazon and it's rather inexpensive for the quality of the product. Check it out by clicking on the add at the side of this page.


~ ~ ~ ~ ~ ~ ~ ~ ~ ~
Citrus Juice
1 mango
2 oranges
2 apples

Peel mango and oranges. Slice mango, oranges, and apples to size of your feed tube on your juice. Juice all in order listed. Strain, enjoy!
~ ~ ~ ~ ~ ~ ~ ~ ~ ~
There you are!

You can add anything to this juice recipe you like. My mom likes to twist it up a bit. Sometimes she will add a couple kiwi, a slice or two of pineapple, maybe a little cantaloupe, or even some honeydew melon. Anything really. It's delicious no matter what you add to it. So have fun, and be creative!

Juice for Health!


Sunday, March 9, 2014

Spinach Lasagna Rolls

Hello Friends,

Today's recipe is going to be a vegetarian dish. I promised more recipes for you vegetarians, and here is one of them. This is recipe is the most delicious non-meat lasagna ever! My whole family raves on and on about this recipe and we've already had it 3 times in 2 weeks. There are a few steps involved, but it's super easy. This lasagna has the perfect Italian kick to it! So whether you just want to get in your greens for the day, or if you don't eat meat, here is your next dinner!

*Note: You can add just about anything to this recipe. If you want to do half spinach and half kale, awesome. If you still want to add meat to the filling, great. You can do just about anything with this recipe. When I put the spinach mixture on to the noodle, I make sure the layer is quite thin and spreads out completely to the edge of the noodle. Once the noodle is rolled up a couple of times, it becomes the perfect thickness of noodle and filling! I'll post the whole recipe at the bottom so that it will be easier for you to copy and paste.

Spinach Lasagna Rolls


Ingredients:
7 large handfuls of washed and drained Spinach
(you can use any type of greens you want)
10 lasagna noodles
Coconut Oil or Butter
2 cups Mozzarella cheese (plus more to sprinkle on top)
1 jar Spaghetti sauce
1 cup Parmesan Cheese (plus more to sprinkle on top)
1 tsp Italian
1 tsp Oregano
1 tsp Cilantro (optional)
1 tsp Parsley
1 tsp Basil
1/4 tsp Garlic Powder
1/4 tsp Onion Powder
 
 
Cook noodles until soft.
 

Wash and drain spinach, then Sauté spinach in your coconut oil/butter with all your seasoning and a little parmesan cheese, drip drain.


Run noodles under cold water to cool down.
 
Lay noodles on a towel and pat dry, careful not to tear them.
 
 
Place noodles on a hard surface such as your counter or a cutting board.
(Yes, I torn some of my noodles.....oops.)
 
 
 In a large pan pour in enough spaghetti sauce to cover bottom to about 1/4" deep.
 
 
In a medium bowl mix together spinach, mozzarella & parmesan cheese.
 
 
Place a thin layer of spinach each prepared lasagna noodle, making sure to spread it to each side of the noodle.
(To some it may look kind of gross, but it is truly delicious!)
 
 
Fold noodle over on top of itself. You should get about 3 1/2 to 4 folds for each noodle, depending on the size of your fold.
 
 
 Place lasagna rolls in the spaghetti sauce in your pan until pan is full. Drizzle spaghetti sauce & sprinkle extra cheese on top.


Bake at 350* for 30 - 40 minutes.


Spinach Lasagna Rolls

Yields: 10 Lasagna Rolls

Ingredients:
7 large handfuls of washed and drained Spinach
(you can use any type of greens you want)
10 lasagna noodles
Coconut Oil or Butter
2 cups Mozzarella cheese (plus more to sprinkle on top)
1 jar Spaghetti sauce
1 cup Parmesan Cheese (plus more to sprinkle on top)
1 tsp Italian
1 tsp Oregano
1 tsp Cilantro (optional)
1 tsp Parsley
1 tsp Basil
1/4 tsp Garlic Powder
1/4 tsp Onion Powder
 
Directions:
Sauté spinach in your coconut oil/butter with all your seasoning and a little parmesan cheese, drain. Cook noodles until soft, drain. Run noodles under cold water to cool down, then lay on a towel and pat dry noodles. Place noodles on a hard surface such as your counter or a cutting board. In a large pan pour in enough spaghetti sauce to cover bottom to about 1/4" deep. In a medium bowl mix together spinach, mozzarella & parmesan cheese. Place a thin layer of spinach each prepared lasagna noodle, making sure to spread it to each side of the noodle. Fold noodle over on top of itself. You should get about 3 1/2 to 4 folds for each noodle, depending on the size of your fold. Place lasagna rolls in the spaghetti sauce in your pan until pan is full. Drizzle spaghetti sauce & sprinkle extra cheese on top. Bake at 350* for 30 - 40 minutes. 
 
 
I hope you have as much fun making this recipe as I did, and enjoying eat it even more! Leave me a comment and let me know how yours turned out.
 
Y'all enjoy your dinner,